Monday, November 5, 2012

Graff - is it cider or is it beer?

I've tried my hand at making hard cider the past few years, but have never really hit on anything I've absolutely loved. So, when I read about "Brandon O's Graff" over at HBT I thought it would be cool to try out. This is something of a hybrid between cider and beer - I'm looking for a cider-like drink with more body and residual sweetness. Instead of using just malt extract and steeping some crystal malts like the original recipe, I decided I would brew up a small batch of amberish beer and add it to a couple gallons of local cider.

I had some leftover grain from my last batch (minus the crystal 120 and chocolate malt I added there), so I threw that into my small 2-gallon cooler that I used to use for doing partial mash batches, batch sparged, and collected about 2 gallons of combined runnings. I added some amber DME I had lying around and threw in some crystal hops and boiled for about 30 minutes. Once it was chilled I tossed it into the carboy and dumped in 2 gallons of fresh-pressed, pasteurized but preservative-free, cider. I had an old vial of Scottish ale yeast in the fridge and decided to forgo making a starter (since I didn't plan ahead like I should have) and just threw it in there. I was nervous about the viability of the culture, but fermentation has been chugging along nicely (hopefully it works ok).

I brewed this up while home with the kids during Hurricane Sandy and it was completely a spur of the moment endeavor. I rushed through everything, only paying attention to getting my mash temp somewhere in the 150s and calculating the hops so as not to exceed 5 IBUs. I have no idea what the original gravity ended up being, though I imagine it was close to 1.050. I'm excited about the potential this has, but really have no idea how it will end up.

Hurricane Graff
brewed on 10/29/12

Recipe Specifications
Batch Size: 3.5 gal
Estimated Color: 8.8 SRM
Estimated IBU: 5.0 IBUs
Brewhouse Efficiency: 72.00 %
OG: 1.050ish SG
FG: TBD
ABV: TBD

Grist - this is a complete extrapolation based on some leftover pre-mixed and crushed grain from a previous recipe
1 lb 5 oz Pale Malt - 53.0%
4.0 oz Pilsner Malt - 10.1%
2.0 oz Crystal 60 - 5.1%
2.0 oz Munich I - 5.1%
2.0 oz White Wheat Malt - 5.1%
0.3 oz Roasted Barley - 0.1%
0.3 oz Acidulated - 0.1% (for mash pH)
8.0 oz Amber Dry Extract - 20.2%

Hops
14 g Crystal[2.80 %] - 30 min

Misc
2 gallons of apple cider

Yeast
Edinburgh Scottish Ale (WLP028)

Mash Schedule
Single Infusion, 153ishºF, batch sparge


Wednesday, October 3, 2012

Cranberries and Brett...again...but different

I should probably ditch this fascination I have with trying to use cranberries in a beer, but there's something about using a locally-grown, native fruit that I just can't let it go.  My first attempt at using cranberries was HIGHLY experimental and had disappointing results (though I am geared up for another tasting to see if time has helped).  Cranberries contain a lot of tannins and they seemed to add a fair amount of astringent bite to the last beer, which was too much for such a dry beer to handle.  But, I've been thinking that a richer, maltier, "sweeter" beer would work well with cranberries.  Especially if I don't overdo the cranberry addition.  So, I brewed up an English-style brown ale sort of beer that will hopefully hold up to the cranberries.

As you can see from the grist bill below, this is decidedly not a standard brown ale recipe and is not the way I would build a brown ale if I were starting from scratch.  But I wasn't starting from scratch.  You see, I had grain already milled for another version of my ongoing attempt to perfect a hoppy red ale recipe I've been playing with the past couple of years.  However, I never got around to brewing it, and I wanted to brew up this new beer so that it would be ready in time for Thanksgiving, and I didn't feel like wasting all this grain.  So, I decided I could start with the grain I had, add some more crystal malt and some chocolate malt and...voila...turn it into a "brown" ale.  Some of the grain weights are a little weird too since I had too much grain in the original red ale recipe for the lower gravity I was looking for with this beer, so I pulled out a couple of pounds of grain and just extrapolated the remaining grain weights based on percentages.

As for the yeast...I decided to go with the Brettanomyces bruxellensis Trois strain I harvested from my multi-grain farmhouse style ale I brewed over the summer.  I absolutely loved the fruity character I got from that strain and I am thinking that it will complement both the malt and the cranberries.

Speaking of the cranberries....I am planning on picking up some freshly harvested fruit from one of the original cultivated cranberry bogs on Cape Cod.  This bog is now currently owned by "Annie's Crannies", but was originally farmed by Captain Henry Hall, the man credited with being the first to commercially cultivate cranberries.  I'll add the fruit to secondary once the fermentation is fully complete.  I'm not sure yet how much I will use, but am thinking on the order of 0.25 pounds per gallon.  I figure it is better to be conservative.  I may also bottle some of the base beer without the cranberries just in case the cranberry version turns out to be not so great.

So much for trying a simpler approach this time around....

[UPDATE 10/21/12 - I decided to rack the entire batch onto 1 pound of cranberries.  The cranberries were picked up fresh from Annie's Crannies, as mentioned above. I vacuum-sealed them, and then froze them, thawed them, then froze them again, before thawing them a second time before racking the beer.  I'll let the beer sit on the cranberries for 10 days or so.  Not sure if this is enough time, but I want to get it in the bottle in time to be ready for Thanksgiving.]

Henry Hall Ale
brewed on 9/26/12

Recipe Specifications
Batch Size: 3.75 gal
Estimated Color: 22.0 SRM
Estimated IBU: 16.9 IBUs
Brewhouse Efficiency: 75.00 %
OG: 1.046 SG
FG: 1.012
ABV: 4.5%

Grist
3 lbs 10.0 oz Pale Malt - 58.9%
12.0 oz Pilsner Malt - 12.2%
6.0 oz Crystal 120 - 6.1%
6.0 oz Crystal 60 - 6.1%
6.0 oz Munich I - 6.1%
6.0 oz White Wheat Malt - 6.1%
3.0 oz Chocolate Malt - 3.0%
0.7 oz Roasted Barley - 0.7%
0.7 oz Acidulated - 0.7% (for mash pH)

Hops
9 g EKG [4.50 %] - 60 min
7 g Challenger [7.20 %] - 30 min

Misc
1 lb of fresh cranberries added to secondary

Yeast
Brettanomyces bruxellensis Trois (WLP644)

Mash Schedule
Single Infusion, 150ºF, batch sparge


Saturday, September 22, 2012

Pumpkin Beer

A couple of years ago I brewed up a really nice pumpkin beer and thought it was about time to try it again.  I even planned way ahead and planted a sugar pumpkin plant in my home garden for the sole intention of using the pumpkins in a beer.  Unfortunately, the plant had some serious issues and I didn't get a single fruit from its vine (in fact, all my squash/cukes/melon plants had issues this year).  So, I went with Plan B and picked up a couple of small pumpkins at a local farm/orchard.

There are a multitude of methods out there for brewing a pumpkin beer - from using a canned puree to baking whole pumpkins in the oven with brown sugar to skipping the pumpkin altogether and just using the requisite pumpkin pie spices.  I didn't like any of those options.  I wanted to use fresh pumpkin, but didn't want to deal with the extra steps of baking it (and the mess and probable stuck sparge that goes along with it).  I did a little research and discovered that the gelatinization temperature for pumpkins falls within the normal mash temperatures.  So, I figured if there's any starch that needs to be converted, it can just happen right there in the mash (though it turns out, as far as I can tell, there's not a lot to convert).

I cut the tops of the pumpkins, scooped out the seeds and stringy pulp, and chopped them up into chunks (rind and all).  I then processed the chunks with my cuisinart with the handy-dandy grater attachement.  The resulting pumpkin "hash" was mixed right into the mash.  After an hour, full conversion was confirmed with an iodine test and I proceeded to sparge as normal with no problems.  The brew process went without a hitch.  I decided to use a combination of EKG and Challenger hops since I have found recently that I really like the beers I've made that use more than a single hop variety - there just seems to be an added dimension to these batches.  I also added a judicious amount of spices (again, using a combination to give the final beer more complexity).  Most pumpkin beer recipes I see out there tend to only add hops for bittering, letting the spices predominate the flavor and aroma, but I like the way English hops meld with the spices, so I opted to add some late hops.

For the yeast, I decided to try something different and went with WLP072 French Ale (Platinum Release)...mostly because I had it already in my fridge after picking it up on a whim earlier in the summer, but also because I figured its malt-forward characteristics would work well in a beer like this.  I pitched a 1 liter starter and fermentation took off.  I currently have it in my "mudroom" (for lack of a better term) where the ambient temp is ~64°F.  I hope to have a few bottles ready for a pumpkin-carving party in October, but I imagine it won't really hit its peak until at least Halloween.

Feathertop 2.0
brewed on 9/19/12 (and into the morning hours of 9/20/12)

Recipe Specifications 
Batch Size: 4.00 gal

Estimated Color: 11.9 SRM
Estimated IBU: 29.9 IBUs
Brewhouse Efficiency: 69.00 %
OG: 1.048
FG: 1.012
ABV: 4.7%

Grist
5 lbs Pale Malt, Maris Otter - 52.6 %
1 lbs Caramunich I - 10.5 %
8.0 oz Melanoidin Malt - 5.3 %
8.0 oz Vienna Malt - 5.3 %
8.0 oz Wheat Malt - 5.3 %
2 lbs Pumpkin, fresh, raw, grated - 21.1 %

Hops
10 g Challenger [7.20 %] - 60.0 min
10 g Goldings, East Kent [4.50 %] - 60.0 min
4 g Goldings, East Kent [4.50 %] - 15.0 min
4 g Challenger [7.20 %] - 15.0 min
4 g Goldings, East Kent [4.50 %] - 1.0 min
4 g Challenger [7.20 %] - 1.0 min

Spices (all added in last minute of the boil)
0.50 tsp Cinnamon, ground
0.50 tsp Nutmeg, ground
0.25 tsp Ginger, ground
0.25 tsp Allspice, ground
0.13 tsp Cloves, ground

Yeast
French Ale (White Labs #WLP072)

 Mash Schedule
Single Infusion, 150°F, batch sparge

Saturday, September 1, 2012

Small batch experiments


I brew 3.5-4 gallons batches. Most of the time the beers spend 3-4 weeks in primary (of the plastic bucket variety) and then I rack them to the bottling bucket and bottle. However, occasionally I move a beer into a 3-gallon glass carboy for extended aging. When I do this, I tend to have a little beer left over in the primary. Recently, instead of dumping this out, I've been racking this left over into a 1-gallon glass jug so that I can try something different with it by adding fruit and/or spices and/or souring cultures. My first experiment of this sort was to add the dregs of Cisco Brewery's Dark Woods to about a half gallon of my 2010 imperial porter, Tabula Rasa. I was a bit skeptical about souring such a big and roasty beer, but it actually turned out fantastic. This success has emboldened me to continue on with this sort of small batch experiments. The only problem I have though is that I haven't really figured out a way to efficiently bottle them without losing too much volume in the process, which is why I currently have several of these in my cellar aging longer than anticipated.

Current experiments (from left to right in the above photo):

Blueberry Wine
I thought I would include this here even though it doesn't fit in with the rest of my beer experiments. Pure blueberry juice from Trader Joe's, augmented with wildflower honey (also from Trader Joe's...I love this place BTW...whenever I shop there I spend a lot of time in the juice aisle thinking about what I could ferment). This particular batch has been sitting there for almost a year now. I should probably bottle it.

Spiced Wheat Wine
Dried Thai red dragon chili peppers, star anise, grains of paradise, and cacao nibs added to my dark wheat wine, Bene Victum. Go bold or go home, right?

Sour Cherry Oatmeal Stout
Tart cherries from Oregon Fruit added to my already funky oatmeal stout. Definitely looking forward to this one.

Sour Kölsch (Crooked Sunbeam)
Oak cubes and the dregs of Russian River's Temptation added to my Sonnenstrahl Kölsch. I added a little DME-based wort with some German Opal hops, lemon peel, and grains of paradise as well to give the RR bugs a little extra to chew on. I only added a little oak, but I am nervous that I have let this beer sit too long. Might be an oak bomb by now.

All of these are probably ready to go into bottles. I just need to find the time to deal with them! Hopefully I'll get it together so that I can get tasting notes for these posted sometime by December.

Thursday, August 23, 2012

Of Bison and Beer

I recently returned from two-weeks in Yellowstone and the Grand Teton National Parks. It was absolutely incredible - between the wide open spaces, the wildlife, the hydrothermal features, and the spectacular mountain views we had a great time. The kids were the perfect ages (8 and 11) and all in all it was a wonderful family vacation. (For those interested, you can check out some photos from the trip here.)

Of course, no vacation would be complete without good beer, right? Luckily, I am happy to say, there is plenty of really good beer in and around the parks. We flew into Salt Lake City and hit the local Whole Foods to stock up before driving out to the parks. I was pleasantly surprised to discover a well-stocked section of local craft beer sold by the bottle, more so since it was a Sunday and I didn't think Utah allowed alcohol sales on Sundays.
Fortunately, I was wrong. I picked up an assorted 6-pack - five from Uinta Brewing Co. and one from the Wasatch Brewery (as a biologist I couldn't resist their "Evolution Amber Ale"). From Uinta I grabbed one bottle each of their Hoodoo Kolsch, Wyld Extra Pale Ale, Cutthroat Pale Ale, Trader Session IPA, and Sum'r Blonde Ale. I don't have any detailed tasting notes from these beers, but they were all good. If anything, some of the Uinta beers may have been too malty and perhaps not quite dry enough. However, I would certainly not hesitate to have them all again. My one regret is not picking up a bottle of Wasatch's Polygamy Porter, which has a tagline of "Why have just one?". Brilliant.

I was also very impressed with the selection of beers available within the park. I had the opportunity to try a few beers that I had heard great things about but can't get at home. I was ecstatic to find Big Sky's Moose Drool and Deschutes' Black Butte Porter. Both were world-class and I wish I could find them around here. Red Lodge Brewery's Bent Nail IPA and Hefeweizen were also quite tasty.

The real stars of the vacation however were a couple of places outside the Grand Tetons, in Jackson, WY - Snake River Brewing and The Bird. We ate dinner at each place twice during our stay and everything we had - food and beer - were excellent. Of particular note was Snake River's Zonker's stout. Full of flavor - rich chocolate and coffee, without any harshness. Perfectly balanced. I've already sent them an email asking for info about brewing this beer. Not sure if I'll get a response, but if I do, this beer will jump to the top of my fall brewing. The Bird served incredible hamburgers and fries and their menu alone is worth reading (it was hysterical to hear my 11-year old daughter order the "Ghetto on a Good Day"). On top of the great food, this place served German beers on tap. I couldn't pass up the Reissdorf Kölsch, served in authentic 0.2L Kölsch glasses. Perfect way to wash down a juicy hamburger on a hot summer evening. If you're ever in Jackson, you have to check this place out (it's a locals joint, so you'll have to drive a bit out of downtown Jackson to find it).

Although this wasn't intended to be a "craft beer vacation", it just worked out so nicely that excellent craft beers were readily available. Fittingly, I even found some amazing hop plants growing in the back yard of the place we stayed while in the Grand Tetons! Moulton Ranch is an old Mormon homestead, so I was surprised to find hops on the property. I spoke with the current owners and they weren't sure when or why the hops started growing there - they've "always been there" and they just let them grow up every year and don't do anything with them. The hops looked amazing and smelled wonderful. I thought about harvesting some (with permission, of course), but I wasn't sure if they were quite ready or if I really wanted to deal with it. Looking back, I now wish I had...how many people can say they've brewed beer with Mormon hops that were probably planted a generation or two ago? Guess I'm just going to have to go back someday!


<-- check out these hops!

Sunday, July 22, 2012

Aged Homebrew - Summit APA Tasting

It's been a little while since I reviewed one of the "aged homebrews" I found in my cellar. This is the third of four beers that were among the very first beers I brewed and which have been sitting in my cellar for a couple of years. So far, both the Irish Red Ale and the Scottish 60/- Ale have held up pretty good to the test of time. I wasn't sure what to expect with this current beer. The mysterious "APA?" on the cap leads me to believe that it is the last surviving bottle of my first attempt at making a red American Pale Ale. Apparently, I didn't know about the "American Amber" category at that point, since I have since learned that what I was attempting to brew pretty much falls under that category. Now that I think about it, this beer can probably be considered to be the genesis of my "Little Rhody Red" recipe that I have been trying to perfect.

However, this beer, at the time that I brewed in back in the summer of 2010, was decidedly NOT good. It wasn't all bad - the aroma was actually quite nice and it looked exactly like I was hoping it would - a nice, reddish orange. Really made you want to drink it. But, the flavor completely did not live up to the promise of the first impression. In fact, I would say this beer was downright deceitful. It looked and smelled delicious, but upon tasting the beer, there was an unmistakable, in-your-face onion flavor. Yes, onion. I've since attributed this flavor to the batch of Summit hops I used. Summit is apparently a somewhat hit-or-miss hop - when its good, it has this wonderful tangerine character (which is what I was going for). But when it's bad, you get onions and garlic (NOT what I was going for). This beer scared me away from Summit, but it is probably worth another shot given that others have had great success with it. In any case, I waited a few months to see if the flavor would dissipate, but it never really did, so most of this batch went down the drain (my only dumped batch so far). I didn't remember hiding a bottle away, though I am glad I did since it gives me the opportunity to see what happens to that onion flavor over the course of a couple of years. Amazingly, time has done great things to this beer.

Appearance - Deep red-brown with a foamy tan head that shrinks away pretty quickly. Darker than it was originally, which seems to be a common characteristic of these old beers. Clarity is excellent.

Aroma - Subdued, but with some hints of roast and caramel. I can definitely still smell some citrus fruit from the Summit hops. Some oxidation is evident as well, but not really cardboardy. More sherry-like. Although different from what I remember it being, this beer smells really quite nice.

Flavor - Rich malt. Some vinous oxidation flavors, but they come across quite nicely, adding a dark fruitiness that makes this beer very interesting. Raisiny perhaps? Still a decent amount of bitterness, though malt clearly dominates. A faint tartness was evident in the first sip, but is harder to detect as I drink. Most importantly though - NO ONION FLAVOR!! Absolutely no hint of it. This beer is 100x better at 2 years old than it was fresh. Once again, these tastings have taught me to never dump my beer (at least not before giving them a couple of years to age). Amazing.

Mouthfeel - Medium body, moderate carbonation. Not as "chewy" as I would have expected given the malt profile. I was expecting something akin to the aged Irish Red. Given the foamy head and the slight tartness, I wonder if there was a bit of a bacterial infection in this bottle, which would also thin it out some. Wish I had thought to take a gravity reading before drinking it all.

Overall - I'm going to sound like a broken record about these old beers, but I'm amazed at how well they have all held up. I had no problem drinking this bottle and wish I had more of it. It's certainly not an American Pale Ale anymore, if it ever was. Not an American Amber either. Given the maltiness and sherry-like flavor, it seems much more 'British' than 'American' at this point. Of course, it might not actually be the beer I think it is - the '?' on the cap and the complete lack of onion off-flavor gives me some doubt, but I cannot think what else it might be. It is different enough from the other aged batches that I have tasted so far and I don't have anything else in my brew log that matches the general specs of this beer. So, I guess I have to conclude that it is indeed my 'Summit APA'. Go figure.

Summit "APA" - original recipe & specs
Partial mash
OG: 1.053
FG: 1.017
SRM: 11.6
IBUs: 36.4

28% Pale Malt
14% Munich Malt
4% Crystal Malt (40L)
2% Roasted Barley
52% Extra Light DME

Summit @ 60 min, 20 min, 8 min, 2 min, & dry hop
Palisades @ 20 min, 8 min, & 2 min
WLP008 East Coast Ale

Monday, July 16, 2012

Sunbeam Kölsch Tasting

I figured a 92°F, humid day was the perfect time to post some tasting notes for my Sunbeam Kölsch (Sonnenstrahl). I brewed this as the companion beer to this year's altbier, using the same yeast, but trying out some Opal hops for the first time.

Appearance - Pretty much crystal clear, yellow-gold with a thin white head that quickly fades.

Aroma - mild, grainy, some fruitiness (not sure if this is from the Opal hops or the yeast).

Flavor - follows the aroma - grainy up front, hint of fruity sweetness and a touch of spice. Bitterness comes through at the end to balance the malt nicely, but doesn't linger. Nice, dry finish makes this extremely easy to drink. I do get a slight touch of astringency towards the end, but it is minor.

Mouthfeel - light body, moderate carbonation (could maybe use a little more).

Overall - perfect beer for a hot and humid summer day, especially after doing some work around the yard. Might actually be my best beer to date from a technical standpoint. It goes down real smooth - in fact, I had to be careful to take my time with this one so I could take some notes. I'm no Kölsch expert, but based on the BJCP description, this could be an award winner. Not sure if I would change anything if I brew this again.

Monday, July 9, 2012

2012 Altbier Tasting

About time I got around to posting some tasting notes from my springtime altbier. Somehow the Spring just rushed past into summer. This is my third attempt at brewing a traditional Düsseldorf Altbier and I think I'm getting close.

Appearance - Clear, orange-brown with a thin, creamy, slightly off-white head that persists while drinking.

Aroma - Mostly grainy malt with a slight touch of spicy fruitiness.

Taste - Solid bitterness that lingers a little before dropping off. Good malt flavors - grainy and nutty. The malt is nicely balanced with some spicy hop flavors. No caramel or noticeable roast, though certainly some grainy sweetness in there. Nice, dry finish. There's also a flavor that I am attributing to the Spalt hops - hard to describe actually - subtly floral maybe, but not perfumy. Overall, for lack of a better descriptor, this beer tastes "German".

Mouthfeel - Creamy head. Light body. Pretty smooth though a touch of lingering astringency. Moderate carbonation. Easy drinker.

Overall - An excellent beer if I do say so myself. As my third attempt at a Düsseldorf Altbier, I think I am slowly dialing in the recipe. My friend and his Düsseldorfer wife give this beer high marks for authenticity. The real test though will be when her father visits sometime in August! Next time, I think I will bump up the IBUs a tad - maybe shoot for 45ish. I also want to try to remove that bit of lingering astringency. I wonder if it was from running a decoction with a mash that was too alkaline (I only recently invested in some ColorpHast strips so I can monitor the mash pH). All in all, this was a very successful beer.

Saturday, June 30, 2012

Multigrain, 100% Brett Farmhouse Ale

Apparently my brewing and my blogging isn't going to be as regular and as often as I had hoped. Oh well. Guess, I'm just going to have to make due with what I can, when I can. I thought I would have brewed more this Spring in anticipation of the hot summer months when I usually take a hiatus from brewing since I lack any real fermentation temperature control. However, since I didn't and since I was itching to brew something, I figured some sort of Saison/Farmhouse-style beer would be perfect to brew while the outdoor thermometer was hitting the mid-90s. Besides, I had never brewed something like this. Only recently has my palate started to appreciate the flavors associated with farmhouse beers, so it was time to brew one up.

Actually, the impetus for this particular beer came several weeks ago. I had read some of Phile Markowski's Farmhouse Ales and then found myself staring at all the raw "alternative" grains in the bulk food aisle of my local Whole Foods. Spelt. Buckwheat. Amaranth. Quinoa. I couldn't help myself, so I grabbed a few pounds of a variety of grains and headed home to research what to do with them.

It took me a while to come up with a plan - reading through Farmhouse Ales some more, perusing various homebrew blogs, searching HBT and Google for any info I could find on using non-barley adjuncts and saison yeasts and cereal mash technique. I finally had a plan and headed out to my local homebrew shop of choice to gather up the rest of the ingredients...only to find that it was closed for a week of vacation. My window to brew was small and I was determined to brew this up, so I headed to another shop which I try to avoid since every time I am there they tend to have about half the ingredients I was looking for. Of course, this time was no different...no saison yeasts of any kind and no Saaz hops. No big deal on the hops, I could sub out something else I had at home already, but I was stuck on the yeast. After looking through their tiny yeast library, I found a vial of wlp644 Brettanomyces bruxellensis Trois. I was intrigued. I had been thinking about doing a 100% Brett beer and here might be a great opportunity. So, I grabbed a vial (along with some wlp072 French Ale yeast in case I got cold feet about using the just the Brett...I didn't, so now I'll need to brew up a Biere de Garde or something with that extra vial...foreshadowing of a future blog post)

Most folks seem to recommend giving a Brett starter 7-8 days before pitching, but I didn't have the time since I was headed out for some vacation with the family. Instead, I made the starter on Saturday, brewed late Sunday night (didn't get to bed until 2:30 am!) and then pitched the starter Monday night, giving ti a full 2.5 days to get going. The starter looked great - just like all my non-Brett starters - and fermentation was going by Tuesday morning, so I am hoping things will turn out OK despite not giving the starter enough time.

I should point out that this was also my first attempt at a cereal mash...which is one reason my brew session took so long. I followed the steps outlined in How to Brew by John Palmer. However, I really didn't know what temp my main mash was supposed to be at. I used the decoction formula presented in How to Brew to calculate it, but I must have done something wrong since I ended up WAY overshooting my target saccharification rest of 150°F ( I hit about 175°F). After 30 seconds or so of unmitigated panic and cursing, I dumped some room temperature spring water into the mash, bringing it down to a respectable 152°F. I let it go for an hour and a starch conversion test with some iodine showed a successful mash. Whew.

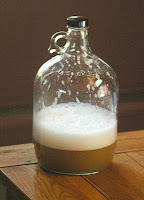
It has only been fermenting for about 6 days now and the gravity is down to about 1.020. The sample smelled and tasted fantastic - full of tropical fruit. I am very much looking forward to seeing how this one turns out.

Threshing Ale
brewed on 6/24/12 (and into the morning hours of 6/25/12)

Recipe Specifications
Batch Size: 3.75 gal
Estimated Color: 5.8 SRM
Estimated IBU: 30.8 IBUs
Brewhouse Efficiency: 65.00 %
OG: 1.045 SG
FG: 1.010
ABV: 4.6%

Grist
2.5 lbs Pale Malt - 32.3 %
2.5 lbs Pilsner Malt - 32.3 %
1 lbs Spelt, Raw - 12.9 %
1 lbs Red Wheat, Raw - 12.9 %
8.0 oz Red Quinoa, Raw - 6.5 %
4.0 oz Acidulated - 3.2 %

Hops
7 g Magnum [14.00 %] - 60.0 min
6 g Saaz [4.00 %] - 15.0 min
4 g EKG [4.50 %] - 15.0 min (I didn't have 10 grams of Saaz on hand)
20 g Motueka [7.10 %] - 1.0 min
8 g Motueka [7.00 %] - Dry Hop
4 g Goldings, East Kent [4.50 %] - Dry Hop

Yeast
Brettanomyces bruxellensis Trois (White Labs #WLP644)

Mash Schedule
Infusion Mash with Precooked Adjuncts
- pulsed the raw grains in a food processor
- ran a cereal mash with the raw grains and 1 lb of the barley malt
- held at ~119°F for 15 minutes
- held at ~152°F for 15 minutes
- boiled for 1 hour
- added cereal mash to main mash sitting at ~127°F (TOO HOT for this mash schedule)
- overshot target sacc. rest - hit 175°F - needed to add ~3/4 gallon of room temperature spring water to bring it down to ~152°F

Wednesday, May 2, 2012

Building an Immersion Chiller

I seem to be slowing down again on the brewing and blogging fronts.  Hopefully that will change soon as I am gearing up for a couple more brew days before the summer hits.  In the meantime, I just thought I'd share some info about building a copper immersion chiller.

As most homebrewers probably do, I started out cooling my wort in a sink filled with ice.  But as I learned the importance of chilling the wort down as quickly as possible, I decided I needed a better process.  Chilling the wort quickly accomplishes a number of things, including:
  1. Prevents the formation of DMS:  DMS (dimethyl sulfide) smells and tastes like cooked corn and is something you usually don't want in your beer.  It forms naturally from SMM (s-methyl methionine), which is found, in various quantities, in malted barley.  SMM is converted into DMS at temperatures above 140°F, so quite a bit of it can be formed during the mashing and boiling stages of brewing.  Fortunately, boiling drives off most of the DMS.  Once the boil is ended however, SMM will continue to be converted into DMS, but now the DMS is no longer boiled off.  So, the quicker you can get your wort chilled, the less DMS you get in your beer.
  2. Produces clearer beer:  When wort is chilled, haze-causing proteins coagulate and drop out of solution.  The faster the rate of chilling, the more these proteins coagulate and drop out.  The more these proteins coagulate and drop out, the fewer there will be in your finished beer.  The fewer of them in your finished beer, the less your beer will exhibit chill haze.  So, faster chilling leads to clearer beer.
  3. Gets you to yeast-pitching temps faster:  Once wort drops below about 140°F, it is susceptible to bacteria and wild yeast.  The quicker you can pitch the your yeast, the quicker you can get a controlled fermentation underway and the less likely you are to have bacteria or wild yeast take hold in the beer (as fermentation proceeds, the pH of the beer drops and the alcohol level increases, creating an inhospitable environment to unwanted microbes).
An immersion chiller is a great way to cool your wort down quickly.  It works on the same principle as the radiator in your car - by circulating a liquid though a set of metal coils in contact with a heat source you want to cool down.  The heat will be conducted by the coils into the cooler liquid and the circulation of the liquid will move the heat out of the wort (or engine), thereby cooling the wort (or engine).  Immersion chillers tend to be made out of copper since it is an excellent thermal conductor.  Since copper is so malleable, making your own immersion chiller is relatively easy.  Here's what I used to build a chiller to fit my 3 gallon kettles:

  • 20' of 1/4" (ID) x 3/8" (OD) flexible copper tubing
  •  10' of vinyl tubing
  •  2 hose clamps
  •  faucet adapter
All total, I spent less than $30.  Though with the price of copper today, you can expect to pay a little more.  As you would also, obviously, if you needed to make a bigger chiller to fit your system.  Here are a few photos of my build:


It works great - with this chiller I can get my wort cooled down to pitching temps in 15-20 minutes.  If I were to do this over again, however,  I'd raise and bend the input and output so that they would be out of the kettle.  The way it is now, if the hose clamps ever loosened up, I'd end up dripping straight tap water directly into the wort.  As it is, I just make sure the clamps are fully tightened before each use.

Saturday, April 14, 2012

Funky Oatmeal Stout - a mixed culture fermentation

Way back in September 2011 I walked out of my LHBS with the ingredients to make a simple oatmeal stout for the Fall weather that was going to be settling in.  However, as I posted earlier, life got hectic, brewing and blogging was put on hold, and the oatmeal stout never saw the inside of a fermentation bucket.

Fast forward to a couple of weeks ago.  I had the time and I had already brewed up the batches I wanted to get done between January and March (a Belgian Tripel, an Altbier, a Kolsch, and this year's Empirical Series brew) and I had this bag of grain sitting in my cellar.  Seemed like a waste not to use it.  But it also didn't seem right to brew an oatmeal stout with the warm weather settling in.  So, inspired by Jolly Pumpkin's Madrugada Obscura and a previous successful experiment of mine with souring dark beer (a tale for another day), I decided to try something different and funkify it.

The base grist is similar to the oatmeal stout I brewed in Fall 2010 with a few tweaks (I can't seem to leave well enough alone).  To that I decided to add some molasses and grains of paradise (available at my favorite spice retailer - the Spice House).  The molasses added some additional gravity and will give the beer a little more depth and character.  The grains of paradise should impart a nice peppery tone.  As if that wouldn't be enough (like I said, I can't leave well enough alone), I opted to ferment with a mixed culture that included a Belgian yeast (WLP500, harvested from my Belgian Tripel), an English strain (WLP023, which was the intended yeast for the original oatmeal stout), the dregs of one bottle of Jolly Pumpkin's Madrugada Obscura, and the dregs of one bottle of Russian River Consecration.  All these cultures were put into the same starter, so were pitched into the beer all at the same time.  How this will all play out is anyone's guess.  I'm just going to keep it in a dark corner of my cellar and patiently wait to see how things proceed.

Oh, and as luck would have it, the "Word of the Day" on the day I made my mixed culture starter was "selcouth"

Selcouth Stout
brewed on 3/26/12

Recipe Specifications
Batch Size: 3.75 gal
Estimated Color: 38.4 SRM
Estimated IBU: 30.8 IBUs
Brewhouse Efficiency: 75.00 %
OG: 1.062 SG
FG: TBD
ABV: TBD

Grist
5.5 lbs Maris Otter - 66.7 %
12.0 oz Oats, Flaked- 9.1 %
8.0 oz Melanoidin Malt - 6.1 %
4.0 oz Chocolate Malt - 3.0 %
4.0 oz Chocolate Wheat - 3.0 %
4.0 oz Crystal (56L) - 3.0 %
4.0 oz Roasted Barley - 3.0 %
8.0 oz Molasses - 6.1 %

Hops
26 g EKG [4.50 %] - 60.0 min
10 g EKG [4.50 %] - 20.0 min

Misc
1.00 g Seeds of Paradise (Boil 5.0 mins)

Yeast
Mixed culture
 - Trappist Ale (White Labs #WLP500)
 - Burton Ale (White Labs #WLP023)
 - dregs of Madrugada Obscura
 - dregs of Consecration


Mash Schedule
Single Infusion, 152°F, Batch Sparge

Friday, April 6, 2012

Beer Blog as Digital Identity

I recently discovered Beer Blogging Friday (aka The Session) and thought it would be fun to start participating in it. Basically, the idea is that on the First Friday of each month beer bloggers all post on the same topic. The topic is determined by pre-identified organizer for the month. That same organizer collects all the links to the posts on their blog into single collection. I've done this sort of thing before on other blogs I used to write (but, sadly, have let languish) and found it a great way to connect with a community that shares similar passions. It's also a great way to discover other great blogs.

This month's Session is hosted by Brewpublic who has provided a topic of "What drives beer bloggers?".

For me, the obvious answer is that my passion for homebrewing drives my blog. It is after all nothing more than an journal chronicling my brewing adventures. At first, I though I would respond to this promt by writing about why I enjoy homebrewing and why I design my own recipes and brew the way that I do. But that's really what drives my beer brewing, not what drives my beer blogging, so instead I thought I'd concentrate on why I decided to take my brewing to the blogosphere.

I don't have a homebrew club or a group of fellow homebrewers to brew with, so, other than my local homebrew shop (Blackstone Valley Brewing Supply, a truly excellent shop) my brewing community is completely virtual. I'm a regular over at HomeBrewTalk.com, I listen to a number of beer-related podcasts on my way to and from work (particularly most anything from The Brewing Network), have struck up a number of friendly correspondences with other bloggers (all through email, of course), and have even done a few beer swaps with folks I've only ever met via the internet. So, in a lot of ways, this blog is my identity within the virtual homebrewing community. You can learn a little about me every time you read one of my posts - what do I like to brew? what is my approach to brewing? what are some of the brewing ideas rattling around in my head? Both my brewing and writing style reveal something about me. For example, you can probably glean quite a bit about my worldview and general philosophy from the fact that I named an entire series of my beers "The Empirical" series, with each one given a name in Latin and honoring some important figure from the Enlightenment. Hell, even the fact that I even have a named series for some of my homebrew tells you something.

Blogging lets me share part of my identity and lets me be part of a larger group. We all want to feel valued by others within whatever community with identify with. I like to think that blogging about my recipes and my techniques and my successes and my failures provides value to other homebrewers out there. Perhaps something in my blog will help a new homebrewer figure out some brewing-related problem, or perhaps a recipe will spark an interest with an experienced brewer and lead them to try something they hadn't before. Like any sort of public demonstration of a creative pursuit, narcissism certainly plays a role (why wouldn't everyone want to read my blog?), but I think the larger driving force is the desire to be part of a community and to interact with others who share similar passions. So, I raise a (virtual) pint to you, my fellow beer drinkers and blog readers. You drive me to blog!

Saturday, March 24, 2012

Aged Homebrew - Scottish Light (60/-) Tasting

This is the second tasting from my aged homebrew "collection". This time, I have a Scottish Ale (a 60 Schilling or 60/-) named #38. This was brewed a couple of years back as a birthday gift for my dad (no, not his 38th birthday). He read the description of the style and it intrigued him, so I surprised him with a case of it (I kept a case for myself...). If I recall correctly, this was my last full 5 gallon batch. Even though I was doing partial mashes, I wanted to minimize the amount of extract I had to use, so I switched to smaller 3.5ish gallon batches on all subsequent brews.

I remember thinking that this beer turned out pretty good - certainly seemed to style - light, easy drinking, malt-forward, dark copper-colored, some fruity esters. Over two years later, it has held up very well and I think it is still a nice example of the style, though perhaps a little too light on the hops. Shortly after I discovered my forgotten stash, I learned that my dad still has some bottles of this left, so I was thinking it might be fun to enter it in a competition or two and see how it stacks up.

Appearance - Pours a dark copper, almost brown, with a thin white ring of bubbles. Clarity is excellent.

Aroma - Very mild aroma. What little aroma there is is definitely all malt - no hop aroma whatsoever. I pick up some toffee and light caramel. Maybe some oxidized quality as well.

Taste - Follows aroma. Very mild, almost entirely malt - toffee, caramel, a hint of roast. Definitely some oxidized flavors as well. A little hop spiciness. Bitterness is barely there - just a touch at the end. Finishes fairly dry. Some sweetness, but not at all like the aged Irish Red I reviewed a little while back. No signs of infection.

Mouthfeel - low carbonation, almost still. On the thin side. Definitely an easy drinker, though a little more body would make it better.

Overall - Yet another successfully aged beer. This beer is very mild, but tastes good. And at 3.4% ABV, it makes for a nice session beer. I could definitely drink several of these, though I think I would want to move onto something with more flavor. This kind of reminds me of a Bass or a Smithwicks - it has that same level of mildness and thin body. So far, I'm enjoying this stroll down beer memory lane. I can't wait to try the remaining aged brews!

#38 Scottish Ale (60/-)
Partial Mash
OG 1.040
FG 1.014
IBUs: 23
SRM: 16

17% Maris Otter
17% Crystal 40L
7.5% Crystal 120L
7.5% Honey Malt
7.5% Munich Malt
2% Chocolate Malt
42.5% Extra Light DME

East Kent Goldings hops @ 60min

WLP004 Irish Ale yeast

Tuesday, March 20, 2012

Wheat Wine - Empirical Series 2012

"Resolve, resolve, and to be men aspire...
Let godlike reason, from her sovereign throne,
Speak the commanding word I WILL, and it is done."


I was a little late getting this year's Empirical brew done. I want to get these done in February of each year, but I couldn't quite squeeze this one in. Early March isn't too bad though I suppose. This year's edition is inspired by Harpoon's Triticus, a dark wheat wine. My wife and I tried this during a brewery tour in Boston a couple of years ago and were both instant fans. Almost immediately I began searching for info to help me design a homebrewed version. The original Triticus was actually the concept of the Alstrom brothers (of Beer Advocate fame) for Harpoon's 100 Barrel Series, and, as luck would have it, they had made available some blog posts about their experience brewing this, including some details about the recipe. I can't seem to find those posts now, but before they disappeared I took down some notes, but hadn't gotten around to brewing it until now.

As is probably self-evident a "wheat wine" is a high gravity wheat ale - basically the wheat version of a barley wine. With this recipe almost half of the grist is wheat, including specialty wheat malts like Cara- and Chocolate wheat. Staying true to the Triticus recipe, the hops are German. Somewhat surprisingly the yeast is a neutral American strain (e.g. WLP001). I thought about using a more characterful strain, but, in the end, decided to remain true to the inspiration.

Unfortunately, brew day did not go as planned. Basically, my efficiency sucked. Normally, I am in the 72-74% range. For this batch I only hit 55%. The only other time my efficiency was this low was also my only other time using this large a percentage of wheat. I've come to the conclusion that because of the smaller size of the wheat grains, my LHBS's mill doesn't crush them as well as it does the larger barley. Luckily, I had some DME around, but, unfortunately, it wasn't the wheat DME I thought I picked up when I bought the ingredients for this batch - I must have grabbed the wrong bag off the shelf. So, a pound of Extra Light DME went into the kettle. I wanted the OG to be higher still (was shooting for the mid-1.090s), but didn't want to use any more extract or simpler sugars, so I decided to leave it in the 1.080s. I just hope it ferments out well. The pound of demerara sugar should help with that (with these high gravity beers, I like to use up to 10% simple sugars).

It is now fermenting away in the basement. I'll let it go for probably a month and then rack it into a glass carboy for extended aging before bottling it sometime this summer. The first tasting will happen sometime around Halloween or Thanksgiving, if I can hold off that long. At the moment, I am toying with the idea of adding either oak cubes and/or cacao nibs when I rack to the carboy. Guess I'll wait to see how it tastes when I get to that point.

UPDATE: I decided to go with the cacoa nibs and skipped the oak

Bene Victum (aka James) - Empirical Series 2012
Brewed on 3/12/12

Recipe Specifications
Batch Size: 3.75 gal
Boil Size: 5.00 gal
Estimated Color: 24.8 SRM
Estimated IBU: 65.5 IBUs
Brewhouse Efficiency: 55.00 %
Boil Time: 60 Minutes
OG: 1.084
FG: 1.012
ABV: 9.4%

Grist
5 lbs Pale Malt (2 Row) UK - 38%
4 lbs Wheat Malt, Pale - 30.4 %
1 lbs Munich I - 7.6 %
6.0 oz Carawheat (50L) - 3%
6.0 oz Chocolate Wheat (450L) - 3%
6.0 oz Wheat, Flaked - 3%
1 lbs Extra Light Dry Extract - 7.5 %
1 lbs Dememera Sugar - 7.5 %

Hops
20 g Magnum [13.10 %] - 60.0 min
10 g Hallertauer [3.80 %] - 20.0 min
10 g Saaz [4.00 %] - 10.0 min
15 g Saaz [4.00 %] - dry hop

Yeast
California Ale (White Labs #WLP001)

Mash Schedule
Single Infusion, 149°F

Misc
aged on 6 oz cacao nibs

Friday, March 16, 2012

Sour Brett & Cranberry Ale Tasting

I brewed this beer, Vaccinium, over a year ago (part one, part two, part three). It was inspired by Ithaca Beer Company's Brute, a beer with Brett and soured only with acidulated malt. Putting my own spin on this idea, I used a wine yeast for primary fermentation and added local cranberries in secondary. It's been in the bottle for about 5 months. Overall, I probably shouldn't be disappointed in this beer given how experimental and off-the-wall it is, but I am. In general it lacks complexity and is missing a certain "brightness" and fruitiness that I was hoping for. Honestly, and unfortunately, it's just not that exciting of a beer.

Appearance - Pours a hazy orange-rose. Not quite as pink as I would have thought with using the cranberries. I think the beer would actually pour clear, but the high carbonation caused the sediment in the bottle to kick-up. Next time, I'll chill the bottle down (this one was probably only chilled down to about 50°F - the temp where I've got these bottles stored in my cellar). A large foamy head quickly subsides to a thin layer. No lacing is left on the glass.

Aroma - Slightly fruity with oak and a phenolic Brett component. Not at all overly funky or barnyard-y, most likely from using Brettanomyces claussenii, which is known to be the most mild species of Brett.

Taste - Sour, but not nearly as much as I would have thought given that acidulated malt made up 13% of the grist. Definite carbonic bite from the high carbonation. Much less fruit flavor than I had hoped for, though really, I wonder how fruity I should have expected using cranberries. Probably, unreasonable expectations on my part. The Brett seems to be coming through as plastic-y, for lack of a better descriptor. There's also an astringency - probably from the tannins in the cranberries and/or oak.

Mouthfeel - Thin and highly carbonated (both as intended). The high carbonation prickles the tongue. There's also a drying sensation on the tongue and throat, presumably from the tannins in the cranberries - my mouth feels the same way it does when drinking cranberry juice (shocker, I know). I suppose it could be the oak tannins as well.

Overall - Unfortunately, I am disappointed by this beer. It has more tannic astringency than acidic sourness. It is lacking the complexity and brightness that I thought it would have. I suppose it is still young and the Brett character may continue to develop over time, so I'll leave it alone for a while and come back to it. Not sure cranberries were a good choice. Or maybe it was a bad idea to add oak cubes. I'll probably try cranberries in another beer at some point - I like the idea of using such a local and native fruit - but I'm not sure I'll try to make a sour beer with just the acidulated malt. Instead, I'd probably go the traditional route of using Lactobacillus and Pediococcus bacteria.

Wednesday, March 7, 2012

Sonnenstrahl (Kölsch-style bier)

My original idea with this brew was to use a simple Kölsch-style recipe, but ferment it with my local wild yeast. However, the slurry I kept was pretty old and I wasn't sure how great an idea it was to use it anymore. Besides, I liked the idea of brewing up an authentic style I hadn't tried before, So, I ditched the "Wild Kölsch" idea and instead decided to go pretty much traditional with this one. I harvested some WLP036 yeast when I bottled Frühlingstraum, this year's altbier, so this kölsch will be a sort of sister beer to the alt - the Sunbeam for my Dreams of Spring. I was going to use the left-over Spaltz hops I had from the alt, but thought that might make the two beer too similar in flavor profile, especially with using the same yeast. So instead I decided to try out some German Opal hops I picked up from Northern Brewer. These aroma hops are described as spicy with tones of citrus, so I think they'll be good used judiciously in this light hybrid beer.

Sonnenstrahl Kölsch
brewed on 3/7/12

Recipe Specifications
Batch Size: 3.50 gal
Estimated Color: 4.4 SRM
Estimated IBU: 30.2 IBUs
Brewhouse Efficiency: 72.00 %
Est Mash Efficiency: 72.0 %
Boil Time: 65 Minutes
OG: 1.045
FG: 1.010
ABV: 4.6%

Grist
3 lbs Pilsner malt - 51.4 %
2 lbs Pale Malt - 34.2 %
8.0 oz Munich Malt - 8.6 %
4.0 oz Wheat Malt, Pale - 4.3 %
1.5 oz Acidulated malt - 1.5 % (for mash pH)

Hops
8 g Magnum [13.10 %] - 60.0 min
10 g Opal [6.30 %] - 15.0 min

Yeast
Dusseldorf Alt Yeast (White Labs #WLP036) - reclaimed from 2012 Altbier

Mash Schedule
Single Infusion, 151°F, Batch Sparge

Saturday, March 3, 2012

Aged Homebrew - Irish Red tasting

I decided to try the first of the four "aged homebrews" I found in my cellar a couple of weeks ago. This was my first attempt at an Irish Red ale and I recall it turned out OK - too dark and astringent, but with some nice fruit esters. This batch was brewed approximately two and half years ago.

Appearance - very dark opaque brown, some ruby highlights in the light. Originally, this beer turned out darker than I was aiming for, but it is even darker now than I remember it. Pours with a nice tan head that dissipates pretty quickly, leaving a thin layer of foam that persists while drinking.

Aroma - all malt, chocolate, toffee, a little roast. Definitely some oxidized vinous aroma there too.

Taste - follows the aroma - sweet malt, caramel-toffee, with chocolate and roast undertones. There is a decent amount of bitterness still in it. Not sure if it is from the hops or the roasted malt or both, but there is enough there to cut balance the malt a little. There's a lingering astringency that I remember being there when I first brewed it - in fact, as I drink more of it, the more I get that astringency - like over-steeped tea. It definitely detracts from the beer, which otherwise is quite nice even at two and half years old. I don't taste the "cardboard" that is usually associated with oxidization, but I definitely taste something there that I assume is oxidation - it tastes "old" if that makes any sense. Maybe "musty", but that sounds too unsavory a description for this flavor - it doesn't really taste bad at all. Hard to explain. Maybe most surprising to me is how clean the beer still is - no sourness, no funk. My sanitation practices must have been pretty good.

Mouthfeel - low carbonation, as was originally intended, but maybe lower still than it once was. Creamy and full. The overall full body goes nicely with the rich, dark flavors.

Overall - honestly, I'm astounded that this beer held up as good as it did. I'm a little bummed that this is the last bottle. I definitely would drink more of it, though probably not more than one in a session. I wish I had tasting notes from when it was young to compare to, but I remember it being lighter, more fruity and not nearly as creamy and chocolatey. It has moved more into a brown ale/porter category now. All in all, I thoroughly enjoyed drinking this beer!

For those interested, here's the basic recipe for the original beer:

Irish-ish Red Ale
Partial Mash
OG 1.051
FG 1.016
IBUs: 27.5
SRM: 20.6

62% Maris Otter
4% Crystal 40L
4% Crystal 120L
4% Roast barley
26% Extra Light DME

Challenger hops @ 60min

WLP004 Irish Ale yeast

Sunday, February 26, 2012

Aged Homebrews - preview

While cleaning up the "homebrew corner" of my cellar this past week, I discovered a hidden stash of some of my earliest homebrews (as if I've been brewing so very long!). I recall putting a bottle of each away, wanting to keep a record of what I had brewed. This was before I truly understood how time can impact a beer. Now, I only store away those beers that I think can hold up to some aging. Even so, I thought it would be interesting to give these four bottles a try and post some tasting notes on them. I threw them in the fridge and will hopefully get to them sometime in the coming weeks. For now, here's a run-down of what I found:

Irish-ish Red Ale:
My first Irish Red ale attempt. This was a partial mash that was 75% malt and 25% DME, a single bittering addition of Challenger hops, fermented with WLP004 (Irish Ale yeast...go figure). This bottle is approaching 2.5 years old. (Tasting notes here)

#38:
My first (and only) attempt at a Scottish Ale...I'll let you decipher the name...it was my (poor) attempt at being clever. Another partial mash recipe - this time with about 60% malt and 40% DME, EKG for bittering, and WLP004 again. I think this may have been my last 5 gallon batch. This bottle is also approaching 2.5 years old. (Tasting notes here)

Summit APA (maybe):
I wonder why that question mark is on the cap. If this is actually my Summit APA, it will be interesting to see how it has aged. I really hated this beer when I brewed it - the Summit hops came out all onion-and-garlic-y. Terrible. This was the first batch where I actually ended up dumping a bunch of it. Too bad too, because if it weren't for the Summit hops, this would have been a killer beer. Thinking about it now, I could probably consider this the initial prototype for my hoppy amber ale that I've been trying to dial in. Of course, the "?" on the cap could mean this is something completely different.

Unlabeled:
I am very excited to discover what this one might be. Not sure why the cap was left unlabeled. I actually think this might be one of my very earliest beers - I'm guessing either an English-style pale ale (my 3rd ever brew) or maybe a southern English Brown Ale (my 4th ever brew, which was supposed to be a Chocolate, Vanilla Porter that didn't quite turn out that way). I suppose this could be my first ever brew as well, a kit called "Holiday Amber", which always confused me since there was nothing "Holiday" about it. Man, it would be fun if it were that beer.

If nothing else, this will be a fun excursion that will tell me just how good my sanitation process really is!

Saturday, February 18, 2012

Tasting: Wild Yeast Saison

Well, it's about time I put up some tasting notes for my wild yeast "saison". I've realized that I delay putting up these posts since I don't really feel like I have a good tasting vocabulary and I find it hard to accurately describe the beers. But the more I do this, the more comfortable I am with it and I really want to make sure I follow up with all my batches. So, I'm going to try to be better about writing more timely tasting posts. And even if this post isn't exactly timely, it's better late than never, right?

So, this is the beer I brewed up using wild yeast (and probably bacteria) I collected from my back yard last June (and in case you missed it, I posted some photos of the wee beasties under a microscope). In short, this beer turned out quite well and did not contain anything near the funk I thought it would have. Even though I didn't really know what to expect from this experiment, the final product was definitely outside of what I thought I was going to get. To help me decipher what I was tasting, I sent a few bottles out to some other folks to taste, including Mike Tonsmeire, the Mad Fermentationist. My tasting notes below will also include some of their comments.

Appearance - Pours a hazy, dirty yellow-brown with a nice thick, foamy white head. Honestly, the color is quite ugly - I don't think the photo above does it justice (must have been the warm afternoon lighting). The head leaves nice Belgian lacing behind.

Aroma - Smells faintly of fruit. Not quite citrus with some mellow spiciness - hard to know if this is from the yeast or the Northdown dry hops. A nice malt aroma comes through as well.

Taste - Here's where things get interesting. First off, the flavor is much cleaner than I ever would have thought from using microbes that were floating around in my backyard. There is a fruity, slightly spicy Belgian-y quality there. There's also a slight tang, though certainly not sour - something reminiscent of fresh lemon peel. The rich maltiness of the Maris Otter comes through nicely, but the beer is not quite a dry as I was hoping for. Even though I mashed low (147°F) and pushed the fermentation temp up into the mid-80s, the beer only finished in the 1.012-1.014 range, which is a bit too high for the Belgian quality of the beer. I was hoping for sub-1.010. One of the more interesting flavors comes through at the back-end. One taster described it as "...almost brett-like...sort of 'woodsy'...I wouldn't say barnyard, but like outdoorsy without the smoke...that smell you get when stepping out to go hunting in the fall.". There is also a lingering bitterness that detracts a little from the beer - one taster likened it to tobacco, another to leather.

Mouthfeel - moderate carbonation and a not-so-dry finish leave this beer a bit fuller than it probably should have been.

Overall - Definitely a good outcome to an interesting experiment. Not sure I would call the beer a great beer, but given what I was attempting to do I am very happy with the result. In the end, it was a pretty refreshing beer with a lemony crispness to it. I actually kept some of the original yeast, hoping to use it in another beer, but it is now 9 months old and I'm not sure how great it would be to reuse. I will definitely try my hand again at capturing new yeast though - this brew demonstrated that it was a worthwhile endeavor.

Wednesday, February 1, 2012

Global warming is messing with my brewing

February 1st. Sixty degrees outside. "Unseasonably warm" according to the forecast. No shit. The average high temp for Feb 1 here is 34°F. The previous record high, set in 1999, was 46°F. So, yeah, I'd say it's "unseasonably warm". So unseasonable, in fact, that my plans to lager this year's altbier are quickly unraveling. You see, I don't have a temp-controlled fermentation chamber or fridge or chest freezer. I rely on the usually predictable seasonal temps and the various locations in my house that tend to stay a more-or-less consistent temp long enough for me to take advantage of them. So, this is why I brew my altbier in January - part of my cellar is in the high 50s/low 60s, perfect for primary fermentation, and my garage is usually in the mid-30s, perfect for lagering. In fact, I was this close to attempting my first true lager this season, since my "mud room" tends to be in the mid-40s this time of year. Luckily, I didn't get around to it. My mud room is in the mid-50s and my garage is currently sitting at a balmy 51°F. Too warm to lager. Hopefully a cold front come through so I can at least pseudo-lager the altbier. Soon.

Thursday, January 26, 2012

Frühlingstraum (2012 Altbier)

Making up for missed brewing time this past fall, this is my 2nd brew of the month. I'm hoping to get one more in, but it will close. This is my 3rd attempt at brewing a Düsseldorf Altbier, a style I was turned onto by a friend whose wife hails from Düsseldorf. Since there aren't many altbiers imported to the US and since, according to my friend and his wife, there aren't really any good American-made versions of the style, I've taken it upon myself to see if I can make something that will satisfy them. The first version, while a fine beer, turned out too dark with a touch of roast character that was out of style. I used less dark malt (chocolate wheat) in last year's version, which turned out lighter, with less roast, and again was a fine beer. But I used a lot of low-alpha Tettnang for bittering and perhaps too much Hallertauer in the middle of the boil. The result was that I felt like it had too much hop flavor, detracting from the style once gain (not to mention that I strayed from using the traditional altbier hop, Spaltz).

So, I tweaked the recipe once again this time around. I cut back the chocolate wheat even more, used some high-alpha Magnum for bittering, and returned to using Spaltz hop for flavor. I also did a single decoction mash for the first time - essentially followin Kai Troester's process for his altbier, mashing in at 150°F and pulling a thin decoction after 45 minutes. I boiled the decoction for about 10 minutes before adding it back to the MLT to hit mash-out @ 168°F.

Everything else proceeded as normal for my brew process. My only concern is that I ended up having to add some baking soda to the mash to offset the amount of acid malt I thought I was going to need for this beer. Hopefully this won't negatively impact the flavor.

I started fermenting this at an ambient temp of 50°F. I was a bit nervous of going this low, but was also pretty sure that the yeast could handle it. Fermentation started no problem, though was never really vigorous. After a couple of days, a cold front swept in and I was nervous that it would drop the ambient temp too low, so I moved the carboy to the part of the cellar where the furnace is located. The ambient here (as far from the furnace as possible) was a steady 58°F. Once fermentation is complete, I'll rack it to another carboy and "lager" it for a few weeks before bottling (I'll stash it in my garage, which is normally in the 30s this time of year, but with the very warm winter we're having, it's currently only in the mid-40s). Should be ready to drink by mid-March (hence the beer's name),

Frühlingstraum Altbier
Brewed on 1/18/12

Recipe Specifications
Batch Size: 3.50 gal
Bottling Volume: 3.50 gal
Estimated Color: 10.4 SRM
Estimated IBU: 40.2 IBUs
Brewhouse Efficiency: 72.00 %
Est Mash Efficiency: 72.0 %
Boil Time: 75 Minutes
OG: 1.047
FG: 1.012
ABV: 4.6%

Grist
2 lbs Munich Malt - 32.3 %
2 lbs Pale Malt (Weyermann) - 32.3 %
2 lbs Pilsner - 32.3 %
2.0 oz Acid Malt - 2.1 % (for mash pH)
1.0 oz Chocolate Wheat (Weyermann)- 1.0 %

Hops
6 g Magnum [13.10 %] - 60.0 min
14 g Spalter [5.00 %] - 60.0 min
10 g Spalter [5.00 %] - 15.0 min

Yeast
Dusseldorf Alt Yeast (White Labs #WLP036)

Mash Schedule
Single Decoction Mash, Batch sparge
  • Saccharification 150.0 F (45 min)
  • 1st Decoction 165.0 F (10 min)

Sunday, January 22, 2012

Irish Red Ale - cloned?

Way back in August I brewed an Irish Red Ale, using Newport Storm's Spring Seasonal as my inspiration. I was trying to hit as close as I could to the original, given a few "constraints" - I couldn't get me hands on amber malt, so I subbed some Vienna malt in its place, and instead of Magnum hops for bittering, I used some Northdown hops that I happen to already have. And oh, I subbed some flaked barley for the Cara-pils in the original (not sure why other than I've never used Cara-pils, instead relying on wheat or flaked barley for body and head retention). I realize that these changes could have a significant impact on the resulting beer. But still, I thought I would get something close.

Gaelic Storm vs. Newport Storm's Spring Ale

Appearance - I hit the color dead-on. Both beers are a beautiful red-brown with an off-white head. Beer Smith estimates my color at 15.6 SRM, but I think both are darker than that - maybe 18ish (though definitely not the 33 SRM that Newport Storm lists on their website). Mine is more highly carbonated and has more of a frothy head. Great clarity. Really, a pretty beer.

Aroma - The aromas are noticeably different. Mine has a more "intense" hop aroma, though, to be fair, I'm judging a bottle of Newport Storm's that is almost a year old given this is their Spring seasonal. Even though they are different, there is still an obvious similarity - both have an earthy, spiciness to them, more so in mine. Much more malt/caramel aroma coming from theirs, which isn't surprising given the grist differences noted above.

Taste - Like the aroma, there is a noticeable difference in flavor. In fact, the taste differences tend to mirror the aroma differences. Bitterness seems about right - noticeable, but not overpowering. Both have a strong malt flavor - bready/toasty, with a hint of roast, but mine is less caramelly/sweet. Again, this is understandable given my substitutions. There's a major difference in hop flavor - mine is much more assertive - very earthy and spicy, perhaps too much so. I attribute this to the EKG hops. I didn't know what Newport Storm's hopping rate or schedule was, so I had to wing it. I think I used too much. I think there is also a bot of carbonic bite adding to the perception of spiciness.

Mouthfeel - Good body. Mine is more highly carbonated, but not so much as to detract from enjoying the beer.

Overall - Mine's not a clone of Newport Storm's, which I didn't really think it would be given the changes I made. Still, both are clearly related. My beer is a pretty easy drinker - malty, but not sweet. Though I think it could use a little caramel sweetness to it. I'd also rather the hop flavor were more subdued - the spiciness overpower the malt and keeps me from enjoying this beer more. Definitely a recipe that I would try again with some tweaks.

Saturday, January 14, 2012

My Brewing Process

Just thought I would share my brewing process since it is not the "standard" way of brewing and it allowed me to move to all-grain without changing much from my extract and partial mash process. I figure this might offer some tips to extract brewers who don't think they can move to all-grain just yet. It is certainly a bit more complex/complicated than necessary to brew good beer, but it works really well for me, and I don't mind the extra steps/complications. This is truly a product of a homebrew geek and I'm not ashamed to admit it.

Essentially, I brew 3.5 - 4 gallon, all-grain batches, using a split boil technique on my electric kitchen stove. With this technique, I have no need to move my operation outdoors, buy a giant brew kettle and a bigger chiller, or figure out how I will transfer large quantities of liquid (I know lots of brewers manage this, but for me, it would be a huge change in my process and equipment, so I have no desire to do so - especially since my process works so well).

When thinking about moving to all-grain, I realized that my limiting factor was how much liquid I could heat on my stove. The simplest solution I decided was to use two kettles - both for heating my strike water and for collecting the wort and brewing the beer. Filled to the brim, my kettles each hold 3 gallons. Safely, I can boil 2.5 gallons of wort in each. This is my limiting factor - I can only collect 2.5 gallons of wort in each kettle. So, my strike water volume is calculated by determining how much I will need so that I collect 2.5 gallons of first runnings. This means that my strike water volume is calculated based on how much grain I am using in my recipe.

Grain absorbs approximately 0.5 quarts of water per pound and since I want to collect 10 quarts of runnings (2.5 gallons), I calculate my strike water volume (in quarts) as 10 + 0.5*G, where "G" is equal to the total weight of my grains, in pounds. What this means of course is that my water-to-grist ratio for my mash changes batch to batch, depending on how much grain I'm using in the recipe. I'm generally between 1.5-2.0 qts/lb on most of my brews and I haven't noticed any differences:

Grain (lbs)Strike water (qts)Water-to-Grist ratio(qts/lb)
6132.17
713.51.93
8141.75
914.51.61
10151.5
1115.51.41
12161.33
1316.51.27
14171.21
1517.51.17


Of course, since I need to heat more than 2.5 gallons of strike water, I need to use both kettles for this as well. For more consistent results, I actually boil 2 gallons of strike water and then calculate how hot I need to heat the additional strike water. For example, for my last batch, the Belgian Tripel, I had 8 lbs of grain in the mash, so I needed 14 quarts (3.5 gallons) of strike water. I boiled 2 gallons in one kettle and heated the other 1.5 gallons to approximately 90-92°F. When combined in my mash tun the temp was 160°F. When I added the grains, the mash temp hit a perfect 148°F. Like I said, my process is a little complex, but it works.

I add any necessary mineral additions to the mash let it go for 60 minutes or so. I then lauter into one of my kettles. If it all works out, I get very close to 2.5 gallons of 1st runnings. While the mash runs, I heat 2.5 gallons of sparge water to 180°F. Once the first runnings are drained, I so a single batch sparge with the entire 2.5 gallons. Since the grain has already absorbed all the water it can, when I drain the 2nd runnings into the second kettle, I get approximately the 2.5 gallons I put in. Simple, right?

I then boil both kettles, generally starting the first runnings while sparging and collecting the 2nd runnings, so they're ~15 minutes apart. For hopping, I go back and forth on whether it is truly necessary to hop both boils. Sometimes I do, sometimes I don't, but I am more and more moving towards splitting the hops - 2/3 in the 1st runnings, 1/3 in the 2nd runnings - for better utilization.

When the boils are done I chill each with my immersion chiller and then dump both into my fermenter. I then aerate, take a gravity reading, pitch the yeast, and clean up. I've found that with this technique I can get ~3.75 gallons into the fermenter. My brewhouse efficiency is 72-74%.

I know this is a complicated set-up. I really need to be on top of all my calculations and pay careful attention on brew day. Managing and monitoring two kettles instead of one also adds a little bit of stress. But, like any brew process, it just takes a little time to dial everything in and I am now very comfortable with it. And in the end, I am very happy with the results.

Tuesday, January 10, 2012

My First Belgian Tripel

After going 5 months without brewing anything (not counting a quick cider and small batch of blueberry wine), I kicked off the new year in style with my first ever Belgian Tripel. Now, I've never been a huge Belgian beer fan - at least not those that smell and taste like cloves and bananas, which is what I always assumed non-sour Belgian beers taste and smell like. But I've always been intrigued by the monastic brewing tradition and have really wanted to like Belgian beers, especially the Trappist and Abbey style ales - there's just something about the history of the whole thing. Then, a few weeks ago, my wife tried a Chimay White (aka Cinq Cents) and she loved it. And then, I tried a homebrewed tripel and quite enjoyed it. Add to that that I've been itching to brew and to try something new, I decided now was as good a time as any to try my hand at this style. Even though I posted a couple weeks ago that my top priority was this year's altbier, I was more excited about brewing up my first Belgian tripel so it jumped to the front of the queue.

I did a little research, wanting to make something similar to Chimay's version. I read up on JZ's recipe in Brewing Classic Styles and Randy Mosher's in Radical Brewing. I found some info online from Brew Like a Monk (I don't own a copy). I googled all combinations of "tripel", "Chimay", "Cinq Cents", "recipe", and "clone". And I read through a great piece by John White and Roger Protz about their search for Chimay's recipes. In the end, I cobbled together the recipe given below. Part of me wanted to go all pilsner malt for the base, but I am unsure about my ability to boil off all the DMS/SMS, so I went with a mix of pilsner and pale malt. I added the wheat malt since it sounds like Chimay uses some sort of wheat in theirs. I used some Munich for a little extra malty character and used the Demerara sugar based on Randy Mosher's suggestion. And since Chimay was ultimately the inspiration for this brew, I used their yeast (WLP500).

The plan is to ferment it starting in the mid-60s°F and then slowly ramp up the temp to make sure the yeast fully ferment this out and leave it nice and dry. I'll bottle condition them for a few weeks and then lager them for a few more weeks.

Cervisia Benedicta - Belgian Tripel
brewed on 1/8/12

Recipe Specifications
Batch Size: 3.75 gal
Estimated Color: 5.1 SRM
Estimated IBU: 32.6 IBUs
Brewhouse Efficiency: 72.00 %
Boil Time: 75 Minutes
OG: 1.069
FG: 1.008
ABV: 8%

Grist
4 lbs Pilsner 43.8 %
2 lbs Pale Malt 21.9 %
1 lbs Munich I 11.0 %
1 lbs Wheat Malt 11.0 %
1 lbs Demerera Sugar 11.0 %
2.1 oz Acidulated 1.4 % (for mash pH)

Hops
28 g Styrian Goldings [4.50 %] (60 min) 24.6 IBUs
2 g Magnum [13.00 %] (60 min) 5.1 IBUs
14 g Saaz [4.00 %] (15 min) 2.9 IBUs

Yeast
Trappist Ale (White Labs #WLP500)

Mash Schedule
Single Infusion, 148°F, batch sparge
Related Posts Plugin for WordPress, Blogger...